Thursday, August 25, 2011

Vegan/Gluten Free Black Bean Burgers!

Hello, friends!


I just spent the last few glorious days cooking 3 square meals a day for a group of AMAZING women on a yoga retreat! I have so many details and photos to share with you, but give me a few days to get everything (thoughts included) in order so I can share with you properly :) Be ready for salivating taste buds, and a strong desire to want to organize your very own private yoga retreat!


In the meantime, I wanted to share something else with you. It's my latest creation: vegan/GF black bean burgers!


There is this amazing restaurant called John's Garden in Malibu where I sometimes go for lunch. It's actually less a restaurant and more a convenience store that happens to have a tiny, inconspicuous kitchen where some of the most tasty things come out of. This includes a black bean burger.


I know, it doesn't sound tasty, but one day, I thought, "what the hell?" and tried one. Oh. My. God.


On a honey oat bun sat my beautiful burger, topped with spicy mayo, avocado, tomatoes and alfalfa sprouts. YUM!


I, of course, wanted to see if I could make one myself. So I scoured the internet, found a few recipes, put them together and made my very own burger for you to try. 


Enjoy!


Lauren's Vegan Gluten Free Black Bean Burgers


2 cans black beans (rinsed and drained)
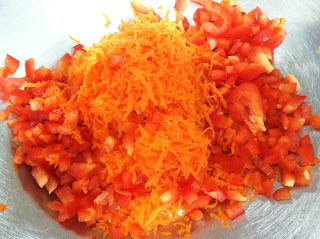
2 carrots, grated
½ red pepper, minced
1 tablespoon chopped parsley
1/2 cup dry rolled oats GLUTEN FREE
1/4 cup sunflower seeds
1 tbsp olive oil
1/2 tsp cinnamon
1/2 tsp cumin
1/2 tsp coriander
1/2 tsp chili powder
1/2 tsp seasoning salt (or onion or garlic powder)
1/4 tsp cayenne pepper (or paprika)
1 tsp sea salt
1/4 tsp black pepper

Preheat the oven to 300 degrees. 
Blend the oats and sunflower seeds in a food processor and grind until coarsely chopped (they will still be a little chunky).  
Grate the carrots, and then add to your mixture in the food processor.  Add 3/4 of the beans, all spices, and the olive oil.  Mix it together.
Put the mixture into a bowl and then add the rest of the beans. Mix it together.  
With wet hands, form the mixture into 8 small patties.  Place them on a non-stick baking sheet and bake at 300 degrees for 40 minutes, flipping them over after 20 minutes.
Serve on a vegan/gf bun, or go bunless, like I did! I topped mine with homemade babaganoush and avocado, and paired it with a mixed green salad. Yummy!!!


Lauren
xxx

Tuesday, August 16, 2011

Vegan Chocolate Almond Shake


Ladies and gents, I’m sure you won’t be surprised by this, but I have a new obsession.

It began one fateful day last month. My beautiful friend, Heather told me I should check out an amazing organic restaurant called Juicy Ladies in The Valley. A second recommendation from my friend Jonathan let me know that they carried vegan desserts! Sweet!

Finding myself having a big space in my calendar, I drove over the canyon and went to this supposedly fabulous place.

In all honestly, I really only cared to get a taste of their delicious vegan desserts. To my disappointment, when I asked for them, the pleasant girl behind the counter informed me that desserts were made by a local vegan pastry chef, and she only delivered them to Juicy Ladies on Mondays. It was Thursday.

Balls!

Trying to hide my disappointment (I had just driven 30 minutes for these things) and not wanting the girl to feel bad, I quickly asked about their smoothies.

Honestly, I didn’t really want one. And they were expensive! But I had driven so far - I needed to get something!

After some discussion, she told me to try the Chocolate Almond Shake. Chocolate? Sure, I could do that. But dates? Yuk! Cocoa nibs? Did that mean it would be bitter?

I reluctantly (and with an embarrassingly closed mind, I might add) handed over my $7.25. After 3 minutes, I got my shake. I took my first sip, and I swear an orchestra popped out of the horizon and played a beautiful melody! It was so delicious! Who knew dates and cocoa nibs could rock my world like that?

It looks me about 5 minutes to suck every last drop out of that cup, and I was itching for more.

I dreamed of this shake for the next 7 days until I drove myself back over the canyon to get another one. This time, I asked what was in it. Then I watched them make it.

Guess what.

I went straight to the store, got all the ingredients, and proceeded to make myself that very same shake for 7 days in a row. It is that good! 

I had to lay off them this week not because I was getting sick of the taste, but because I was starting to crave them and nothing else, and at 500+ calories a pop, I should have been using it as a meal replacement rather than as dessert. Ooops. Sorry hips! 

So, I now give you the recipe with these words of caution: use it wisely!


Juicy Ladies Chocolate Almond Shake

4 dates, chopped
1 tablespoon cocoa nibs
1 teaspoon vanilla powder
1 teaspoon cocoa powder
2 tablespoons raw almond butter (I’m sure you can sure regular almond butter too)
½-1 cup coconut water (this will depend on how thick you want it, and how good your blender is)
2 cups ice

Place all the ingredients in a blender. If you have a vitamix, this is your best bet. Blend until smooth. If it’s not blending, add more coconut water, and shake the blender around. Every so often, you might want to open the lid, take the plug out of the wall, and move everything round with a spoon. Plug it back in and keep mixing! Make sure you blend it thoroughly - I didn’t blend it long enough the first time and there were chunks of dates in my sips - not pleasant!


Thank you to Juicy Ladies for being so amazing and wonderful and changing my culinary world!! Please do check them out if you are in L.A http://www.juicyladies.com/index.htm.

Have a beautiful night, everyone!

Lauren
xxx

Wednesday, August 10, 2011

Kids Yoga!

Let's play a game.

First, you have to close your eyes. Get your imagination in gear.

All set?

Ok. I'm at the front of a play room, otherwise known as the kid's room at the transitional living home I volunteer at each week. Toys surround me. I'm standing on a yoga mat, eager and nervous to give my very first kids yoga class. In front of me are about a dozen children, 3 of them cute as buttons at 1 ½ years old, not quite able to make words with the noises that come excitedly out their precious little mouths. They're not really interested in staying on their mats. Shocking.

Then we've got the cute but rambunctious boys and girls from 5 to 15 years old, some really wanting to do yoga, others wanting to show me and the rest of their friends what they already know, and others undoubtedly thinking, “who is this chick?”

20 minutes later, and we've done every possible animal pose and noise I can think of, and things are getting loud. I mean really loud. One talented boy is rolling himself around in his yoga mat and showing me his human version of a pig-in-a-blanket. His friend joins in. The 1 ½ year old girls are screaming excitedly and clapping their hands at the sight of it all. Another one is stuck to me like glue, and climbs all over me like I'm his own personal jungle gym. Pretty sure he even grabbed my chest at one point. Did I feel violated? No time to feel, people – only to react and move on to the next kid who was trying to do airplane at the back of the room!

40 minutes to go. Oh dear. Do I suck? Am I doing this wrong? I listened to all the advice you guys gave me. What's wrong with me?

Funny how dealing with children can bring up all sorts of things about our ego, and cause us to question ourselves in ways the children have no understanding of. Though I spent my early teenaged years babysitting kids of all ages, and dealt with my fair share of kid related experiences, last night was the deepest version of humble I think I've ever experienced.

About to lose my mind, I called savasana, and tried to get the kids to sit still and lay down for 10 minutes to come them down. This was an entirely new hurdle to jump over. I felt like the mean teacher tapping her stick at the chalk board at the front of the class room, looking menacing with her furrowed eyebrows on her angry face. Yoikes!

After savasana, we (me and the other volunteers) got wise and brought the little ones into a separate play room. Us older kids stayed in the play room and played Simon Says for the final 10 minutes of kids night. Yes – my little man was still climbing all over me.

Once the mats were rolled up and put away, and the kids slowly trickled out of the room as their parents picked them up, I was rattled but still standing, and shaking my head in spite of myself. I'm all for throwing myself into situations that make challenge me in different ways, and this one certainly did!

The volunteer coordinator worried that I may not want to do it again. Are you kidding me? Of course I will! Band-aids have been applied to my wounds, my ego is on the mend, and I'm even more energized to see what next week has to offer!

But first, I've got to make it through tomorrow: we're going on a 6 hour field trip to the science center. Many children, many entrances and exits, many opportunities for escape. Excellent.
Lauren
xxx


Thursday, August 4, 2011

Vegan Gluten Free Pizza with basil oil, roasted cherry tomatoes and Caramelized Onions

I love pizza. My stomach, however, does not. Even with my Italian roots (thanks, beautiful mama!) and having grown up gorging on pizza, pasta, cutlets and everything cheese and carbs, I have trouble digesting pizza today. Most of the time, I just suck it up, take the stomach ache, and eat the pizza because it is soooo good, and also, because there really are no alternatives. But that all changed on Tuesday night.

Thanks not only to Babycakes NYC and Erin McKenna's latest cookbook, but also to DAIYA cheese, an amazing brand of faux cheese that is dairy-free, case-in free and soy-free and doesn't taste like cardboard, I was able to make a yummy vegan gluten free pizza that my stomach would stand for!

Does it taste like real pizza? Honestly - of course not! Without yeast to make the dough rise and the gluten that so many of us have a love hate relationship with, you don't get the chewy crust that you're used to. And don't think I'm fooling myself - Daiya cheese, though it may be delicious, doesn't taste a thing like the mozzarella cheese that I hold near and dear to my heart. But there are a few other elements to eating pizza that this creation satisfies. Nostalgia and texture.

If you're like me, picking up a slice of pizza with your hands and taking a bite will take you back. And there is something about the texture of a crust topped with gooey cheese that makes you want to keep eating even if you're full. Those very important elements are satisfied with this recipe.

And guess what! It tastes great too!

You can choose whatever toppings you want, including tomato sauce, but I opted for something different:

Basil oil as my sauce, and roasted cherry tomatoes and caramelized onions as my toppings. Here's how you do it:

Gluten Free Vegan Pizza Dough

1 1/2 cups Bob's Red Mill All-Purpose Gluten-Free Baking Flour
1/2 cup brown rice flour
1/2 cup sorghum flour
1 tablespoon baking powder
1 teaspoon salt
1/2 teaspoon xanthan gum
6 tablespoons melted refined coconut oil, + 2 tablespoons
1 tablespoon agave nectar
1 garlic clove, minced
1 cup cold water

Cornmeal

Toppings:

Basil Oil

25g basil leaves
75ml Olive Oil
1 garlic clove, minced
salt and pepper to taste

Cherry Tomatoes:

1 package cherry tomatoes
2-3 tablespoons olive oil
salt and pepper to taste

Caramelized Onions:

8 medium sized onions, sliced
2-3 tablespoons olive oil
2 teaspoons sugar
salt and pepper to taste

Preheat oven to 350F.

Prepare your cherry tomatoes: cut them in half, and place on a pan with olive oil (enough to just cover them), salt and pepper to taste. Roast them for 40 minutes.


Prepare your onions: Heat a pan over medium-high heat with olive oil. Once the oil is hot, place the onions in, tossing them with a wooden spoon to ensure they are all covered with oil. After about ten minutes, add a pinch of salt and a few teaspoons of sugar to help with the caramalization process. Fry them until they are brown, about 30 minutes. Set aside.


Mix your dough: Whisk your dry ingredients together, and once mixed, add all of your wet ingredients, including the garlic. Combine with a rubber spatula. Cover the dough in plastic and refrigerate for 20 minutes.


Cover a flat surface with corn meal. Place the dough on top. Place more corn meal on top of the dough (this prevents sticking). Roll it out. This might not be pretty, as you can see :) I actually ended up rolling is out with my fingers and a rolling pin directly on the pan. See what works for you!


Once rolled out to the desired thickness (1/4 inch is great), place it in a 350 oven for 15 minutes.

In the meantime, prepare your basil oil: place all ingredients in a food processor and blitz until a nice sauce is formed (it will look like pesto, but a bit runnier).


Take the pizza out of the oven and spread basil oil over the top. Then top with tomatoes and onions. Then top with daiya cheese. Place it back in the oven for 10-15 minutes, until the cheese is melted to desired consistency.


Yummy! Pizza that your sensitive tummy can enjoy!


Lauren
xxx


Monday, August 1, 2011

No Udder Desserts

t’s 1pm in the afternoon. I had the more glorious morning - grocery shopping at Trader Joe’s, Chocolate Almond shake from Juicy Ladies, and the most amazing conversation with Trisha, the owner and founder of No Udder Desserts at her Thousand Oaks location.


Now I’m sitting on the couch, eating a Vinkie, compliments of Trisha. What the heck is a vinkie, you ask?

Well a Vinkie (isn’t that such a fun word to say?) is a vegan Twinkie! It’s one of Trisha’s top sellers at No Udder Desserts, and as I shove this last piece in my mouth, I can see why.


My 30 minute conversation with Trisha left me feeling motivated and inspired. Sharing with Trisha my plans to open up Delectable You next year, she was gracious enough to offer me some advice that she wished she had been given before opening. Friends, you have no idea how helpful it is to get advice from people who are already doing what you want to be doing, so when they share with you, they may as well be giving you a million dollars.

Not only did I leave No Udder Desserts with some new found knowledge that I will be applying to my business plan (now in its editing stage), I also left with some treats! And as I took photos and sampled these desserts when I got home, I had a thought:

Starting now, each week, I am going to feature and write about a chef or restaurant/bakery in whatever city I am in. I’m going to interview the chefs, the staff, and the owners whenever possible to give you a full idea of their concept, their passions, and how they come to life on your plate. Why do this? Because, quite frankly, this life is not all about me! In putting together my business plan, I have done hours and hours of research, from surfing the internet to find out how many cupcakes Crumbs and Sprinkles sell in a day, a week, a month, what their financials are, who else is doing vegan/gluten free desserts, what percentage of the population is celiac, has dairy sensitivities, and, and, and...to driving around L.A. sampling pastries as well as savory foods that I’ve read about in blogs, magazines, newspapers and heard about from friends and family. What I’ve ended up with is a re-introduction to my fat jeans (thank god I didn’t throw those out!) and a heart felt goodbye to my skinny jeans as the pounds have been packed on (clearly I don’t just taste: I taste, then eat...a lot!), many miles on the car and more trips to the gas station than I care to think about, but more importantly, a much bigger understanding of the business I am in, and want to dive further into. I’ve sat with many restaurant owners who have given me advice, and in return, I want to feature their wonderful restaurants and the amazing things they are doing not only because of their hard work, but also, and more importantly, because of their unrelenting dedication to their goals and dreams. These are the people who turn their can’ts into cans, and their dreams into plans.

So, without further ado, I give you, No Udder Desserts! Trisha Lobefaro is the owner and baker of this bakery, “a healthy alternative to the udder.” Not able to eat dairy, she soon grew tired of not being able to enjoy the desserts many of her peers could enjoy, so she decided to take matters into her own hands. Thus, No Udder Desserts was born.


“Trisha began No Udder Desserts, Inc. almost 4 years ago under the practice of balancing the decadence and succulence of dessert with animal-friendly recipes. Now, with the help of fellow dairy-free eater Julie Zunder, the No Udder Desserts name is expanding and broadening their already delectable palette. No Udder Desserts, Inc. allows you to indulge in your desires while remaining healthy, dairy free and animal free. Even true dessert lovers cannot taste a difference.”

The Woodland Hills location that I had the pleasure of visiting this morning is the first store front for No Udder Desserts. They opened their doors in May of this year, but before that, were selling their products wholesale to different restaurants around the city, including The Vegan Joint in Woodland Hills and Culver City http://www.theveganjoint.com/, Lotus Vegan in North Hollywood http://www.lotusvegan.com/, and The Vegan House in Hollywood http://www.myveganhouse.com/, to name a few. Though their first retail store is open, they continue to supply those locations with their products, so check out the websites for more details!

The Menu

What can you get at No Udder Desserts? I thought you’d never ask.

I tried the chocolate cupcake...


The whoopie pie...


And, of course, the Vinkie!

Cakes and Cupcakes: chocolate peanut butter banana, chocolate chocolate, vanilla vanilla, red velvet, chocolate coconut, coconut, lemon poppy seed, lemon, carrot cake.


Other desserts: cheezecake, cookie bars, and cluster’s (corn flakes with peanut butter and sometimes chocolate too - YUM!).


Other vendors: No Udder Desserts also carries vegan and gluten free products from other vendors, so if you are seeking gluten free as well, you have options! There were 3 different type of cookies including snickerdoodle, chocolate chip and trail mix, as well as whoopie pies.

Beverages: a selection of coffee and tea.

*Catering is also available.
*They also do special occasion cakes including birthdays and weddings!

Pricing

One of the things that struck me about No Udder Desserts was that their prices are so reasonable! $2.50 for a cupcake, $1.50 for a mini piece of cake, and a few dollars (I can’t remember exactly) for a mini whoopie pie or a cookie. Typically, vegan desserts cost much more than this, so it really was a pleasant surprise.

Location and Contact

20839 Ventura Blvd
Woodland Hills, CA
91364

They are located in a strip mall and are not visible from the street, so slow down!

Website: http://www.noudderdesserts.com/
E-mail: noudderdesserts@aol.com
Phone: 818-340-4194

Trisha, if you’re reading this, thank you so much for the chat this morning! You are such a lovely person, and I cannot wait to see No Udder Desserts grow and become a household name! I look forward to seeing you again very soon!

To everyone else, if you are in L.A., vegan or not, make the trip out to No Udder Desserts - you won’t be disappointed! And if there is a restaurant/chef/bakery in your city that you want me to talk about on my blog, send me the name of the restaurant along with some information and pictures, and I will feature it/them! And if you are a restaurants/chef/bakery and you want me to come to your place and feature you, I'd be happy to! Contact me at lauren.lobley@gmail.com.

Eat, drink and be merry, friends! And for the love of all things sweets, eat a Vinkie!!


Love always,
Lauren
xxx